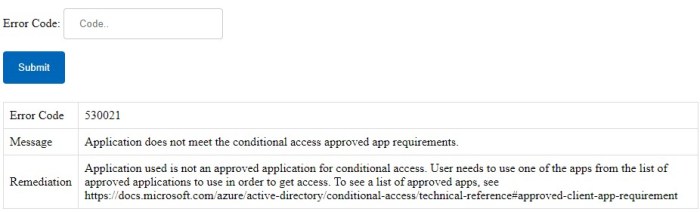
Recently I was working with a customer to troubleshoot Azure AD authentication errors logging into a custom application. I knew that there is a support page for Azure AD Authentication and authorization error codes, but as the article points out “[e]rror codes and messages are subject to change”. More interestingly they also linked to a page where you can get current information on error codes: https://login.microsoftonline.com/error.
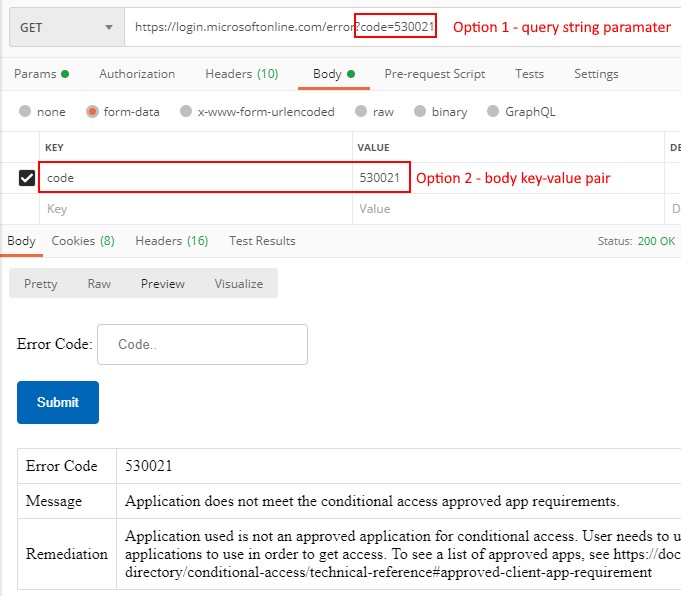
If you would like to programmatically retrieve the output you can pass in the code…:
as a query string parameter
as a form-data submission on the body of the request.
See the sample screenshot below. Only one option is necessary.
As you may notice, the response after submission is an HTML response and not JSON, XML, or another text format. If you would like to see alternate output formats please upvote this Azure feedback suggestion to add JSON support.
In this post I showed a quick tip on how to retrieve current information on Azure AD authentication / authorization error codes. Additionally you can retrieve it programmatically if needed as well as a feedback suggestion to upvote for additional output formats. Hopefully this can help save you time troubleshooting scenarios should you need it.
A few months ago I shared a tweet with a few quick links for learning about Kusto Query Language (KQL) and Azure Log Analytics. Since that time Azure Sentinel (which sits of top of Azure Log Analytics) has been released to general availability (GA). In this post I’ll build on that tweet and share a number of resources for starting out with Azure Sentinel / Azure Log Analytics and KQL.
Most Microsoft cloud services emit logs for audit, operational, etc. purposes. These logs are useful for gaining insights into who is using the service and how they are using it but sometimes it is not always easy to query these services. You might be restricted to only a few thousands records at a time, a limited set of filters, or other constraints. Azure Log Analytics and KQL make it possible to query a large number of records (in my experience millions to hundreds of millions) in a short time period (seconds in most cases instead of minutes or hours).
Kusto Query Language (KQL)
Over the years I’ve used T-SQL to query SQL Server when needed, but I am by no means an expert in the T-SQL language or concepts. Having a basic understanding of T-SQL did make it easier for me to understand the entry level concepts of KQL such as filtering, ordering, grouping, and more. Intermediate to advanced concepts like time based aggregations or self referential queries took a little more time to understand but my Data & AI PFE peer Ken Kilty provided a lot of good advice in this space.
For all Office 365 data the ingestion of data is free. Azure AD audit logs and sign-in logs will be charged according to the reserved capacity or pay-as-you-go per GB model.
Retention of data in an Azure Sentinel enabled workspace is free for the first 90 days. Beyond the first 90 days pricing is per GB per month.
Ex. Storing Office 365 logs for 9 months, a customer would only be charged for (9 months – 3 free months) = 6 paid months.
If you are looking to test out the service “for free” it is possible to configure an Azure Sentinel enabled workspace to ingest Office 365 data and limit the retention of data to < 90 days. Once you get comfortable with the data schema and writing queries you can increase the retention period.
Sample Queries
In the course of working with customers on monitoring their Office 365 environments I and my teammates have developed a number of KQL queries to find “interesting” data points. I’ve shared these queries in the following GitHub repo. Note that these sample queries are provided as-is with no warranty. If you have any queries of your own that you would like to contribute feel free to submit a pull request (or open an issue) to the repo for review.
Last year I had never heard of Log Analytics, Azure Sentinel, or KQL. This year I am seeing it pop up in so many places inside and outside of Microsoft. I am very eager to see where these technologies go and spread the word about them. I truly see interesting problems that can be solved with enough data and the right query. Hopefully this post will give you a nudge in the right direction to start (or continue) looking at these technologies.
I was reading a blog post by Mark Heath on This resource group will self destruct in 30 minutes which leverages an open source Azure CLI extension to automatically delete resource groups. This extension accomplishes the deletion by scheduling a logic app in the same resource group. I was curious if I could accomplish the same effect without the need to leverage the Azure CLI (i.e. for any resource group created via portal, PowerShell, etc.) In this post I’ll show how to configure a “self destruct” mechanism using an Azure Alert and a Logic App.
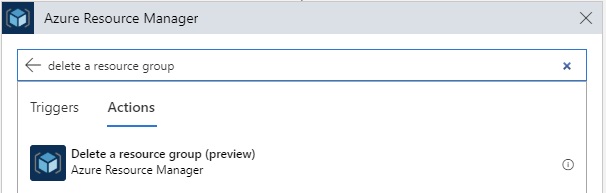
Finalize Logic App – Add JSON schema from alert HTTP request and action to remove resource group to logic app
1) Create Resource Group
If you don’t already have one, create a resource group to host the resources for the self destruct solution.
2) Create Logic App
Create a logic app in the resource group from previous step. Add a trigger for When a HTTP request is received. We will not fill out any of the details for the trigger at this time. Click Save.
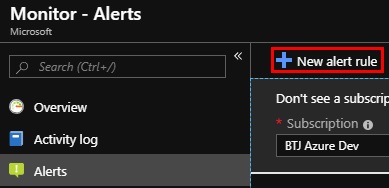
3) Activity Log alert
Navigate to Azure Monitor (can search from the top search bar or go through All Services) for the subscription where the solution will be deployed.
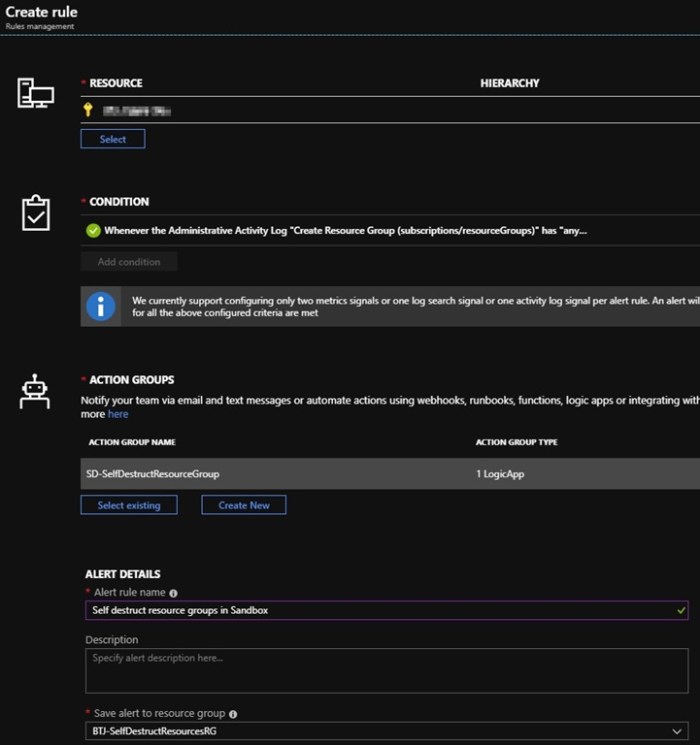
Click Alerts on the left hand navigation. Click New Alert Rule.
Define the resource to be monitored:
Resource:
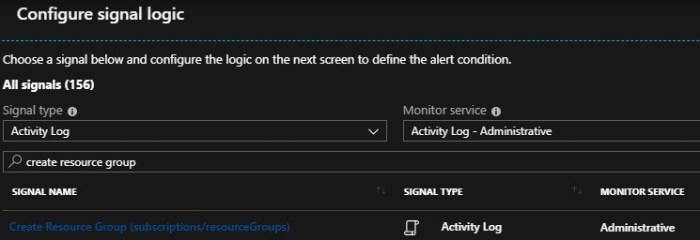
Condition:
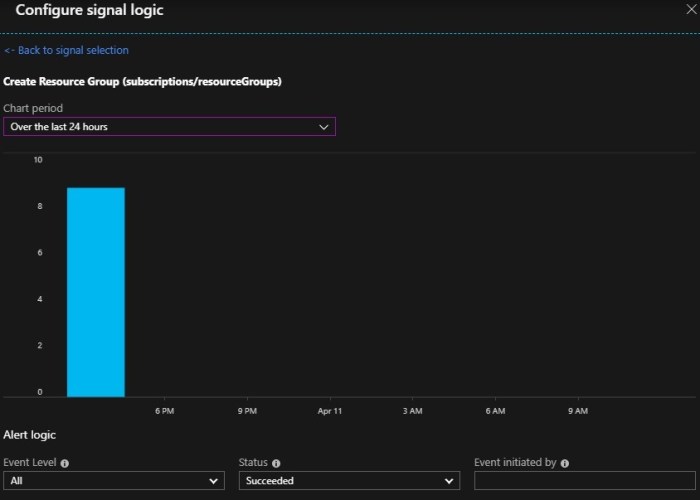
Signal Type: Activity Log
Monitor Service: Activity Log – Administrative
Signal Name: Create Resource Group (subscriptions/resourceGroups)
Alert Logic – Status: Succeeded
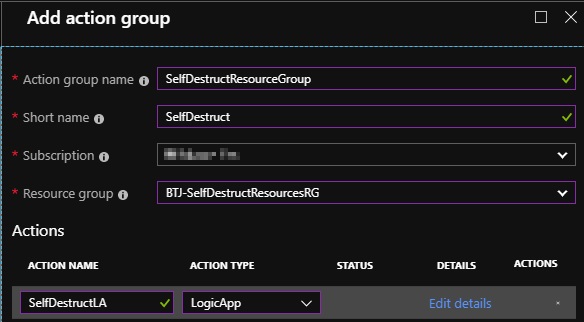
Action Groups:
Action Group Name: SelfDestructResourceGroup
Short Name: SelfDestruct
Subscription:
Resource Group:
Action Group Action: LogicApp
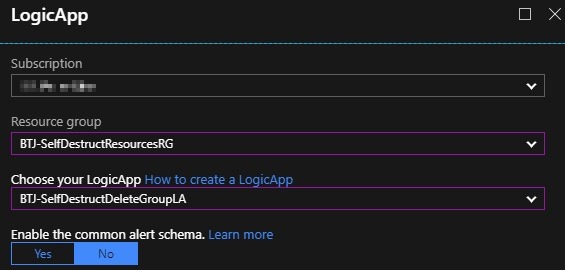
Subscription:
Resource Group:
Logic App:
Condition – configure signal logic part 1Condition – configure signal logic part 2Create new alert action group with a logic app actionCreate a new alert action to go in action groupOverview screenshot for rule creation
4) Trigger Alert
Create a new resource group that will then trigger the alert defined in step 3 and consequently fire the HTTP trigger for the logic app defined in step 2.
5) Gather JSON Schema
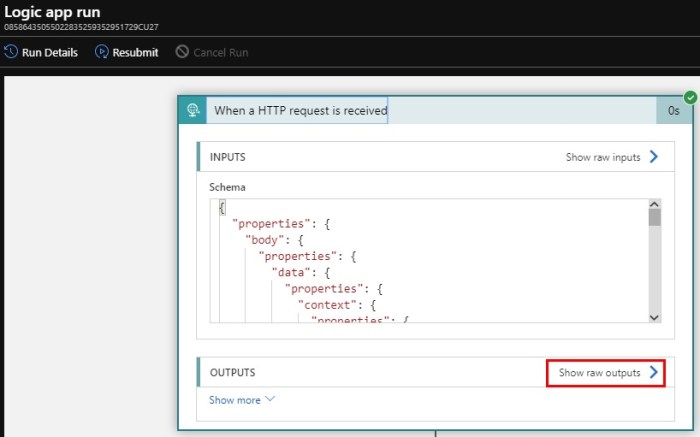
Navigate to the logic app defined in step 2. Assuming the logic app was successfully triggered, under Run history select the successful logic app execution. On the “logic app run” screen expand the trigger and click on Show raw outputs.
Save this JSON for use in the next step. If you are unable to collect this JSON schema you can use the sample below which is already coverted to the final format needed.
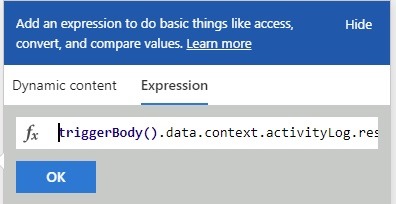
Note: the resoureceGroupName element is buried many levels deep. We will query for this when needed.
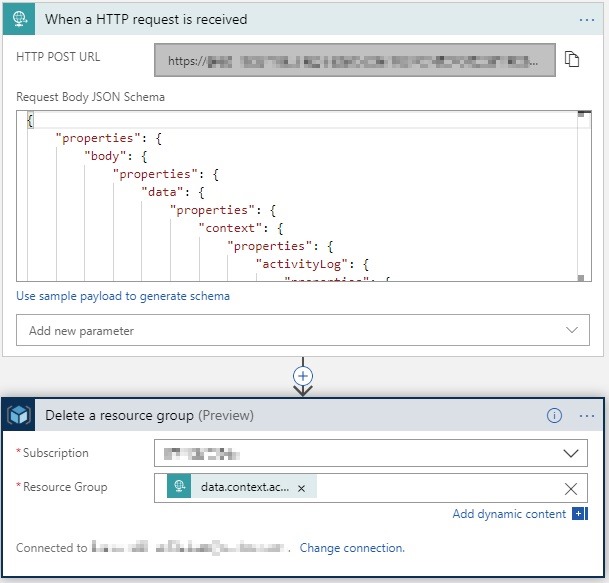
The final logic app will look similar to the following:
Test Solution
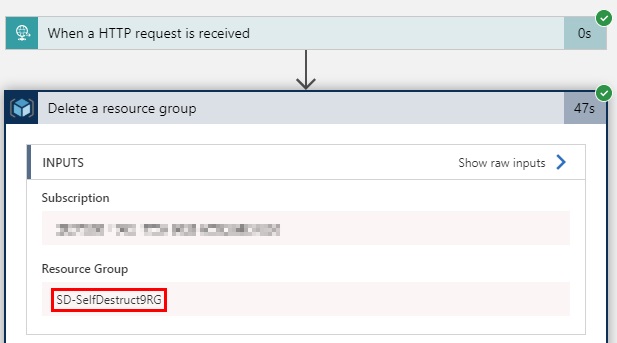
Test out the solution by adding a new resource group to the monitored subscription. Check the Azure Monitor alerts to see if the Activity Log entry for successful resource group creation triggered the Logic App.
Then verify the logic app execution history shows the resource group deletion was successful.
Next steps
More than likely you will not want to delete the resource group right after you create it. In that case you can add a Delay action which pauses the logic app for a specified number of minutes (ex. 60 minutes). Additionally you could apply conditional logic to check if the name of the resource group matches (or doesn’t match) a specific pattern. There are many additions you can add to personalize this solution to your needs.
Conclusion
In this post I walked through an adaptation of the Azure CLI extension that Mark Heath linked to. We leveraged an Azure Monitor alert together with a logic app to provide an option to self destruct any resource group no matter where or how it was created. If you have any feedback or additional suggestions feel free to leave them in the comments.
In this post I’ll share a set of linked Azure ARM templates (link) that can be used to deploy a number of Azure resources together. This sample uses externally linked ARM templates using a parent to child relationship as well as including a few “complex” scenarios like conditional logic and assigning permissions through role assignments. Note there are also two ways to deploy these templates: 1) at the subscription level (owner) and 2) at the resource group level (contributor).
<Update 2019-04-09>After reading this article on ARM template lifecycle management do’s and dont’s I’m rethinking using externally linked ARM templates. Below example still contains them but I may update to combine into a single ARM template at a later date once I’ve had a chance to test.</Update>
Background
For a recent customer project we had a need to deploy the following resources.
Resource group
Azure Storage Account
Azure Function App
Azure Application Insights
Azure Log Analytics workspace
Azure Automation Account
A few of these resources have dependencies on each other such as the Function App requiring a storage account to store solution data into blobs / queues, Automation Account requiring Log Analytics for pushing diagnostic stream data to a workspace, etc. While it is possible to deploy all of these resources in one (very) large ARM template, we also wanted to be able re-use pieces and parts of this solution in future projects that are going to have a similar (but slightly different) architecture. We decided to create a set of parent-child ARM templates to mimic the first 2 levels of the above hierarchy.
Solution
The sample files are stored in my Blog-Samples repo under the ARM-External-Templates folder. There is a brief README file to walk through the necessary steps to update parameter files, upload the linked templates to a storage account, etc. This is not a fully documented process at the moment but if you wish to submit a PR or open an issue I’ll update more as I have time.
A few key pieces to highlight.
The “Contributor” scenario assumes that the deployment account has contributor permissions to a specific resource group or subscription (more common for production or similar environments)
The “Owner” scenario assumes that the deployment account has owner permissions to the entire subscription (ex. development environment)
The “Owner” scenario optionally deploys role assignments (queue sender, workspace reader, and runbook operator) to various resources only if the corresponding parameter values are not empty (otherwise skip assignment)
The Automation Account is pre-populated with a PowerShell runbook and also configured to send runbook job and stream output to the provisioned log analytics workspace
Sample output
After running the deployment script the deployment and resource group should look as follows.
Conclusion
The linked ARM templates from this sample are meant for illustration purposes only. Hopefully you’ll find them helpful in terms of what is possible from a deployment and configuration perspective. If you have any feedback or suggestions please submit a PR on the repo or open an issue on GitHub. Good luck with automating your Azure deployments.
Thanks to all of the attendees from my Dipping Your Toe into Cloud Development session from DogFoodCon 2018. Below are my slides and code samples from the session. Feel free to reach out if you have questions or comments.
Calling the Microsoft Graph, SharePoint Online, or other resource via an Azure AD Application is a fairly straightforward process when you use client ID + secret for the authentication mechanism. You can think of the client ID and secret as a username and password for authentication. Note that anyone who has that client ID + secret can log in as that Azure AD App and perform the actions that it has been granted. In an enterprise or secure environment certificate authentication is a more secure authentication option as it requires physically having the certificate which will only be deployed in a private fashion. In this post I’ll walk through how to deploy and leverage the necessary components to accomplish this. This example is part of a larger Azure Functions sample that I plan to release at a later date but the snippets below could be adapted for other hosting platforms.
Components Needed
Certificate (self-signed or generated from a PKI-type infrastructure)
Azure AD Application (using V1 in this example) with Microsoft Graph OAuth permissions
Azure Function
Solution Overview
Create certificate (self-signed in this example)
Create Azure function
Create Azure AD application registration
Add certificate metadata to Azure AD application
Deploy certificate to Azure Function certificate store
Authenticate to Azure AD application using certificate
1) Create Certificate
If you are on Windows 8+ there is a PowerShell commandlet to create self-signed certificates easily. If not you’ll need to leverage MakeCert.exe or another certificate generating mechanism (ex. New-SelfSignedCertificateEx, documentation). Here is a sample of the PowerShell option.
# process for Windows 8+ type OS
$ssc = New-SelfSignedCertificate -CertStoreLocation $CertificateStoreLocation -Provider $ProviderName `
    -Subject "$CertificateSubject" -KeyDescription "$CertificateDescription" `
    -NotBefore (Get-Date).AddDays(-1) -NotAfter (Get-Date).AddYears($CertificateNotAfterYears) `
    -DnsName $CertificateDNSName -KeyExportPolicy Exportable

# Export cert to PFX - uploaded to Azure App Service
Export-PfxCertificate -cert cert:\CurrentUser\My\$($ssc.Thumbprint) -FilePath $certificatePFXPath -Password $CertificatePassword -Force

# Export certificate - imported into the Service Principal
Export-Certificate -Cert cert:\CurrentUser\My\$($ssc.Thumbprint) -FilePath $certificateCRTPath -Force
2) Create Azure Function
You can create an Azure Function from the Azure Portal (reference), Azure CLI (reference), or through tools / extensions built into Visual Studio 2017 (reference) / Visual Studio Code.
3-4) Create Azure AD Application and Add Certificate to Azure AD Application
Here is a sample for creating an Azure AD application using Azure PowerShell. In this example the certificate is added (-KeyCredentials) to the Azure AD application at time of creation, but it could also be added after the fact through the Azure Portal or PowerShell as well.
While there is a native way to upload a certificate to an Azure App Service via the Azure CLI and the Azure Portal there is not a direct way via PowerShell. I was able to mimic an option with PowerShell by adding an SSL binding with a certificate and then immediately removing the SSL binding while not deleting the certificate (“-DeleteCertificate $false”). Below are examples for both options.
Note: In both examples below the password will be entered as cleartext instead of using a SecureString or other encrypted mechanism. This could pose a security risk but I haven’t found an alternative as of yet.
6) Authenticate to Azure AD application using certificate
The Azure Function code can authenticate to the Azure AD application using the certificate that was deployed in step 5. Below is a sample of the code used to retrieve the certificate. Since Azure Functions can be run locally or in Azure this will work locally if the certificate has been deployed to the certificate store or in Azure when deployed to the App Service.
public static X509Certificate2 GetCertificate(string thumbprint)
{
X509Store store = new X509Store(StoreName.My, StoreLocation.CurrentUser);
try
{
    store.Open(OpenFlags.ReadOnly);

    var col = store.Certificates.Find(X509FindType.FindByThumbprint, thumbprint, false);
    if (col == null || col.Count == 0)
    {
        return null;
    }
    return col[0];
}
finally
{
    store.Close();
}
}
Below is a sample of using the certificate to authenticate to SharePoint Online, but this could easily point to a different resource such as Microsoft Graph, Exchange Online, etc.
var url = Environment.GetEnvironmentVariable("tenantRootUrl");
var thumbprint = Environment.GetEnvironmentVariable("certificateThumbprint");
var resourceUri = Environment.GetEnvironmentVariable("resourceUri");
var authorityUri = Environment.GetEnvironmentVariable("authorityUri");
var clientId = Environment.GetEnvironmentVariable("clientId");
var ac = new AuthenticationContext(authorityUri, false);
var cert = GetCertificate(thumbprint);  //this is the utility method called out above
ClientAssertionCertificate cac = new ClientAssertionCertificate(clientId, cert);
var authResult = ac.AcquireTokenAsync(resourceUri, cac).Result;

#next section makes calls to SharePoint Online but could easily be to another resource
using (ClientContext cc = new ClientContext(url))
{
    cc.ExecutingWebRequest += (s, e) =>
    {
        e.WebRequestExecutor.RequestHeaders["Authorization"] = "Bearer " + authResult.AccessToken;
    };

    #make calls through the client context object
    #…
}
Conclusion
This process is part of a much larger solution used to make authenticated calls to an Azure AD application from an Azure Function. I am working on publishing that solution as a sample for others to reference. I am hopeful that I’ll have something available within a month. For the time being feel free to reference the above steps and code snippets for use in your own project. Feel free to contact me or leave a comment if you have questions or feedback.