Creating a C# Azure Function to Call Microsoft Graph

This post is a part of The Third Annual C# Advent.

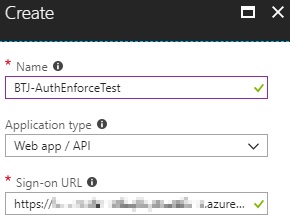
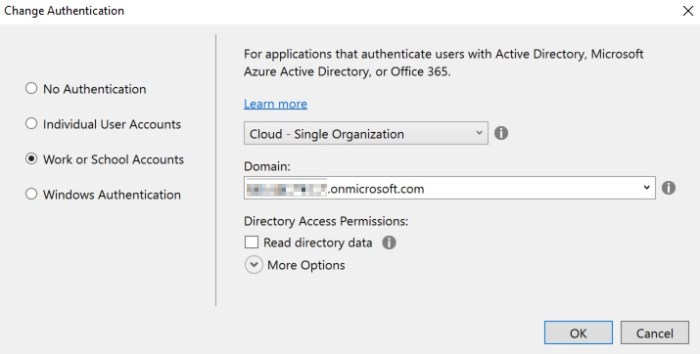
Building on my “Introduction to Calling Microsoft Graph from a C# .Net Core Application” post from the 2018 C# Advent event, this year we’ll take what we learned and adapt that code to run in an Azure Function.  I recommend reading that post (and the linked resources in it) first to get the background on creating and authenticating an Azure AD application.

Prerequisites

Background

Azure Functions is one of the serverless options within Azure (read here for more about Azure serverless solutions).  Azure Functions consist of a trigger (HTTP, timer, storage event, etc.) and optionally one or more input / output bindings.  I especially appreciate how triggers and input / output bindings reduce, or even completely remove, the need to write what I call “internal plumbing” code.  “Internal plumbing” code is the code required to connect to an Azure storage account, monitor for a webhook request, or similar event based functionality.  Having that functionality taken care of allows you as the developer to focus on writing the core business logic where the most value can be provided.

Speaking of bindings, you may notice on the Azure Functions documentation that there are Microsoft Graph bindings for Azure Functions as of version 2+.  I’m not on the product group but as far as I’m aware these bindings have been in preview for over 2 years and are not planned to move past preview.  As such this blog post will walk through calling Microsoft Graph using the Microsoft Graph .Net SDK.

The below steps can be seen in the sample repo at BTJ.CSAdvent.AZFunc on GitHub. Additionally the Develop Azure Functions by using Visual Studio Code documentation gives a good overview of the VS Code development process.

Create Azure Function

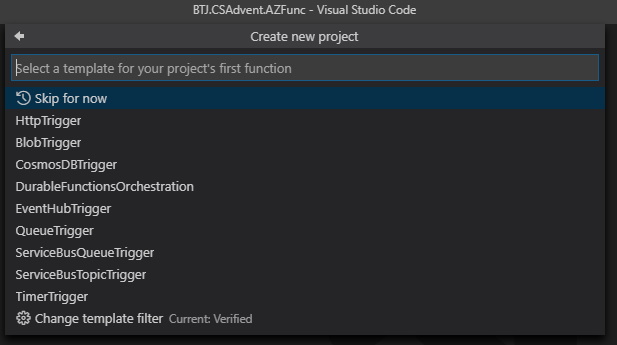
Open Visual Studio Code and open the Command Pallete (⇧⌘P or F1 on Mac, Ctrl+Shift+P or F1 on Windows).

  1. Search for “Azure Functions: Create New Project…” and select it.CSAdvent-MSGAZFunc1
  2. Choose a folder to create the project in (preferably not in a Visual Studio Code workspace).
  3. Select the language of the project as C#.
    CSAdvent-MSGAZFunc2
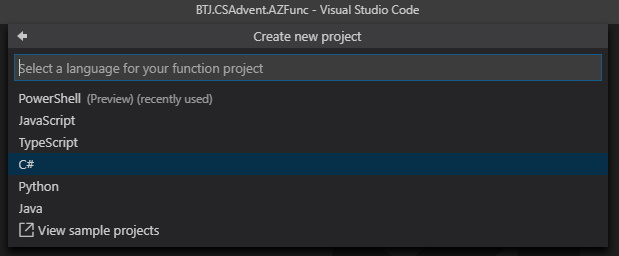
  4. Create an empty function project by selecting “Skip for now” when prompted for the trigger type.
    CSAdvent-MSGAZFunc3
  5. Open the Command Palette again and search for “Azure Functions: Create Function…” and select it.
    CSAdvent-MSGAZFunc4
  6. Select a TimerTrigger.
  7. Name the function “GetUserMicrosoftGraph” (or any name you wish, but later references will be impacted).
    CSAdvent-MSGAZFunc5
  8. Provide a namespace for the function.
  9. Use the default timer schedule “0 */5 * * * *” which is the CRON representation of running every 5 minutes.
  10. On the terminal at the root of the project run “dotnet build” to build the project.
    • If you are prompted to choose a storage account and are using Windows, select “Use local emulator”.
    • If you are on Mac / Linux, select “Select storage account” and specify a cloud Azure storage account.CSAdvent-MSGAZFunc6

At this point you should have an Azure Function project that should build successfully.

Add NuGet Packages

Since we’ll be calling Microsoft Graph and the MSAL .Net SDK libraries we’ll add the supporting NuGet packages with the following:

  1. Run “dotnet add package Microsoft.Graph” from the terminal.
  2. Run “dotnet add package Microsoft.Identity.Client” from the terminal.

Add Azure AD App Authentication

Open the local.settings.json file.  It should look similar to the following (AzureWebJobStorage may be different depending on choices above for storage).

CSAdvent-MSGAZFunc7

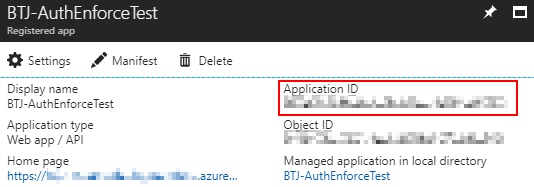
Add the following key/value pairs to the Values section.  Use the values from the Azure AD application that was created using the references in the linked articles above.

   "timerSchedule": "0 */5 * * * *",
   "AzureADAppTenantId": "YOUR_TENANT_ID_HERE",
   "AzureADAppClientId": "YOUR_CLIENT_ID_HERE",
   "AzureADAppClientSecret": "YOUR_CLIENT_SECRET_HERE",
   "AzureADAppRedirectUri": "YOUR_REDIRECT_URI_HERE"

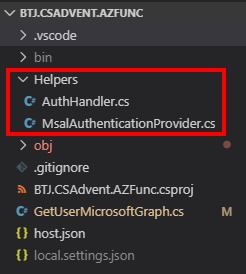
Implement the sample code (link here) from last year’s post as helper classes to the project.  See AuthHandler.cs and MsalAuthenticationProvider.cs from the example repo.

CSAdvent-MSGAZFunc11

Call Microsoft Graph

Implement the following code (adapted from last year’s post, link here) inside the GetUserMicrosoftGraph.cs file.

 public static class GetUserMicrosoftGraph
    {
        private static GraphServiceClient _graphServiceClient;

        [FunctionName("GetUserMicrosoftGraph")]
        public static void Run([TimerTrigger("%timerSchedule%")]TimerInfo myTimer, ILogger log)
        {
            log.LogInformation($"C# Timer trigger function executed at: {DateTime.Now}");

            //Query using Graph SDK (preferred when possible)
            GraphServiceClient graphClient = GetAuthenticatedGraphClient();
            List<QueryOption> options = new List<QueryOption>
            {
                new QueryOption("$top", "1")
            };

            var graphResult = graphClient.Users.Request(options).GetAsync().Result;
            log.LogInformation("Graph SDK Result");
            log.LogInformation(graphResult[0].DisplayName);
        }

        private static GraphServiceClient GetAuthenticatedGraphClient()
        {
            var authenticationProvider = CreateAuthorizationProvider();
            _graphServiceClient = new GraphServiceClient(authenticationProvider);
            return _graphServiceClient;
        }

        private static IAuthenticationProvider CreateAuthorizationProvider()
        {
            var clientId = System.Environment.GetEnvironmentVariable("AzureADAppClientId", EnvironmentVariableTarget.Process);
            var clientSecret = System.Environment.GetEnvironmentVariable("AzureADAppClientSecret", EnvironmentVariableTarget.Process);
            var redirectUri = System.Environment.GetEnvironmentVariable("AzureADAppRedirectUri", EnvironmentVariableTarget.Process);
            var tenantId = System.Environment.GetEnvironmentVariable("AzureADAppTenantId", EnvironmentVariableTarget.Process);
            var authority = $"https://login.microsoftonline.com/{tenantId}/v2.0";

            //this specific scope means that application will default to what is defined in the application registration rather than using dynamic scopes
            List<string> scopes = new List<string>();
            scopes.Add("https://graph.microsoft.com/.default");

            var cca = ConfidentialClientApplicationBuilder.Create(clientId)
                                              .WithAuthority(authority)
                                              .WithRedirectUri(redirectUri)
                                              .WithClientSecret(clientSecret)
                                              .Build();

            return new MsalAuthenticationProvider(cca, scopes.ToArray());;
        }
    }

Test Azure Function

Test out the Azure Function by doing the following:

  1. Run “dotnet build” from the terminal.
  2. Assuming the build is successful you can then execute the Azure Function locally by pressing the F5 key.

See below for sample output.

CSAdvent-MSGAZFunc12

Deploy Azure Function

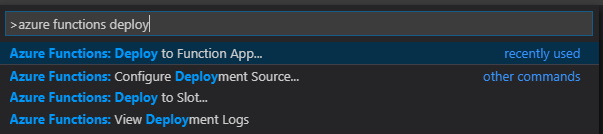
The Azure Functions extension for Visual Studio Code makes the deployment process much easier.  Search for “Azure Functions: Deploy to Function App…” and select it.

CSAdvent-MSGAZFunc9

I already have a consumption based, Windows hosted Function App deployed in my Azure subscription but you can also create a new one if needed.  Select the subscription and Function App to deploy to.

Upload App Settings

When you develop the Azure Function locally you make use of the local.settings.json file which is automatically loaded as environment variables.  In Azure though you will need to create those configuration values as app settings on the Function App.  Rather than manually add / edit those values, search for “Azure Functions: Upload Local Settings…” and select it.  This will upload any values you have in your local.settings.json as app settings on the Function App.

IMPORTANT: If you specified the AzureWebJobsStorage key to use local storage, do not overwrite that value in Azure.  Instead use the cloud Azure storage account already specified.

CSAdvent-MSGAZFunc10

(Bonus) Add Key Vault Integration for Client Secret

While it is possible to specify the Azure AD app secret in the Function App configuration settings (stored encrypted), anyone with read / edit access to the Function App will be able to view that value as plain text through the Azure portal.  As such it is recommended to store the value in Azure Key Vault or similar location.  To specify a location in Azure Key Vault following the documentation on Use Key Vault references for App Service and Azure Functions.

The reference in your Function App configuration will now look something like the following:

@Microsoft.KeyVault(SecretUri=https://yourvault.vault.azure.net/secrets/yoursecret/ec96f02080254f109c51a1f14cdb1931)


Conclusion

In this blog post we walked through the process to create, test, and deploy a C# compiled Azure Function that calls Microsoft Graph.  The sample repo can be found on GitHub at BTJ.CSAdvent.AZFunc.  Thank you for reading along and please open an issue on GitHub repo if you run into any issues with the sample project.  Enjoy the rest of The Third Annual C# Advent.

-Frog Out

Azure Functions Calling Azure AD Application with Certificate Authentication

Calling the Microsoft Graph, SharePoint Online, or other resource via an Azure AD Application is a fairly straightforward process when you use client ID + secret for the authentication mechanism.  You can think of the client ID and secret as a username and password for authentication.  Note that anyone who has that client ID + secret can log in as that Azure AD App and perform the actions that it has been granted.  In an enterprise or secure environment certificate authentication is a more secure authentication option as it requires physically having the certificate which will only be deployed in a private fashion.  In this post I’ll walk through how to deploy and leverage the necessary components to accomplish this.  This example is part of a larger Azure Functions sample that I plan to release at a later date but the snippets below could be adapted for other hosting platforms.


Components Needed

  • Certificate (self-signed or generated from a PKI-type infrastructure)
  • Azure AD Application (using V1 in this example) with Microsoft Graph OAuth permissions
  • Azure Function


Solution Overview

  1. Create certificate (self-signed in this example)
  2. Create Azure function
  3. Create Azure AD application registration
  4. Add certificate metadata to Azure AD application
  5. Deploy certificate to Azure Function certificate store
  6. Authenticate to Azure AD application using certificate


1) Create Certificate

If you are on Windows 8+ there is a PowerShell commandlet to create self-signed certificates easily.  If not you’ll need to leverage MakeCert.exe or another certificate generating mechanism (ex. New-SelfSignedCertificateEx, documentation).  Here is a sample of the PowerShell option.


# process for Windows 8+ type OS
$ssc = New-SelfSignedCertificate -CertStoreLocation $CertificateStoreLocation -Provider $ProviderName `
    -Subject "$CertificateSubject" -KeyDescription "$CertificateDescription" `
    -NotBefore (Get-Date).AddDays(-1) -NotAfter (Get-Date).AddYears($CertificateNotAfterYears) `
    -DnsName $CertificateDNSName -KeyExportPolicy Exportable

# Export cert to PFX - uploaded to Azure App Service
Export-PfxCertificate -cert cert:\CurrentUser\My\$($ssc.Thumbprint) -FilePath $certificatePFXPath -Password $CertificatePassword -Force

# Export certificate - imported into the Service Principal
Export-Certificate -Cert cert:\CurrentUser\My\$($ssc.Thumbprint) -FilePath $certificateCRTPath -Force


2) Create Azure Function

You can create an Azure Function from the Azure Portal (reference), Azure CLI (reference), or through tools / extensions built into Visual Studio 2017 (reference) / Visual Studio Code.


3-4) Create Azure AD Application and Add Certificate to Azure AD Application

Here is a sample for creating an Azure AD application using Azure PowerShell.  In this example the certificate is added (-KeyCredentials) to the Azure AD application at time of creation, but it could also be added after the fact through the Azure Portal or PowerShell as well.


# prepare certificate for usage with creating AAD app
$KeyStorageFlags = [System.Security.Cryptography.X509Certificates.X509KeyStorageFlags]::Exportable, `
    [System.Security.Cryptography.X509Certificates.X509KeyStorageFlags]::MachineKeySet, `
    [System.Security.Cryptography.X509Certificates.X509KeyStorageFlags]::PersistKeySet
$certFile = Get-ChildItem -Path $CertificatePFXPath
$x509 = New-Object System.Security.Cryptography.X509Certificates.X509Certificate2
$x509.Import($certFile.FullName, $CertificatePassword, $KeyStorageFlags)
$certValueRaw = $x509.GetRawCertData()

$validFrom = $x509.NotBefore
$validTo = $x509.NotAfter
$keyId = [guid]::NewGuid()

$keyCredential = New-Object -TypeName "Microsoft.Open.AzureAD.Model.KeyCredential"
$keyCredential.StartDate = $validFrom
$keyCredential.EndDate= $validTo
$keyCredential.KeyId = $keyId
$keyCredential.Type = "AsymmetricX509Cert"
$keyCredential.Usage = "Verify"
$keyCredential.Value = $certValueRaw

$aadApp = New-AzureADApplication -DisplayName $AADAppName -Homepage $HomePage -ReplyUrls $ReplyUrls `
    -IdentifierUris $IdentifierUri -KeyCredentials $keyCredential


5) Deploy certificate to Azure Function

While there is a native way to upload a certificate to an Azure App Service via the Azure CLI and the Azure Portal there is not a direct way via PowerShell.  I was able to mimic an option with PowerShell by adding an SSL binding with a certificate and then immediately removing the SSL binding while not deleting the certificate (“-DeleteCertificate $false”).  Below are examples for both options.

Note: In both examples below the password will be entered as cleartext instead of using a SecureString or other encrypted mechanism. This could pose a security risk but I haven’t found an alternative as of yet.

PowerShell

$BSTR = [System.Runtime.InteropServices.Marshal]::SecureStringToBSTR($certificatePassword)
$ClearTextPassword = [System.Runtime.InteropServices.Marshal]::PtrToStringAuto($BSTR)

New-AzureRmWebAppSSLBinding -ResourceGroupName $resourceGroupName -WebAppName $webAppName -Name $webAppDNSName -CertificateFilePath (Get-ChildItem .\$certificatePFXPath) -CertificatePassword $ClearTextPassword
Remove-AzureRmWebAppSSLBinding -ResourceGroupName $resourceGroupName -WebAppName $webAppName -Name $webAppDNSName -DeleteCertificate $false -Confirm:$false -Force


Azure CLI

az webapp config ssl upload --certificate-file "(certPath)" --certificate-password "(certPassword)" --name "(certName)" --resource-group "(resourceGroup)"

6) Authenticate to Azure AD application using certificate

The Azure Function code can authenticate to the Azure AD application using the certificate that was deployed in step 5.  Below is a sample of the code used to retrieve the certificate.  Since Azure Functions can be run locally or in Azure this will work locally if the certificate has been deployed to the certificate store or in Azure when deployed to the App Service.


public static X509Certificate2 GetCertificate(string thumbprint)
{
X509Store store = new X509Store(StoreName.My, StoreLocation.CurrentUser);
try
{
    store.Open(OpenFlags.ReadOnly);

    var col = store.Certificates.Find(X509FindType.FindByThumbprint, thumbprint, false);
    if (col == null || col.Count == 0)
    {
        return null;
    }
    return col[0];
}
finally
{
    store.Close();
}
}


Below is a sample of using the certificate to authenticate to SharePoint Online, but this could easily point to a different resource such as Microsoft Graph, Exchange Online, etc.

var url = Environment.GetEnvironmentVariable("tenantRootUrl");
var thumbprint = Environment.GetEnvironmentVariable("certificateThumbprint");
var resourceUri = Environment.GetEnvironmentVariable("resourceUri");
var authorityUri = Environment.GetEnvironmentVariable("authorityUri");
var clientId = Environment.GetEnvironmentVariable("clientId");
var ac = new AuthenticationContext(authorityUri, false);
var cert = GetCertificate(thumbprint);  //this is the utility method called out above
ClientAssertionCertificate cac = new ClientAssertionCertificate(clientId, cert);
var authResult = ac.AcquireTokenAsync(resourceUri, cac).Result;

#next section makes calls to SharePoint Online but could easily be to another resource
using (ClientContext cc = new ClientContext(url))
{
    cc.ExecutingWebRequest += (s, e) =>
    {
        e.WebRequestExecutor.RequestHeaders["Authorization"] = "Bearer " + authResult.AccessToken;
    };

    #make calls through the client context object
    #…
}


Conclusion

This process is part of a much larger solution used to make authenticated calls to an Azure AD application from an Azure Function.  I am working on publishing that solution as a sample for others to reference.  I am hopeful that I’ll have something available within a month.  For the time being feel free to reference the above steps and code snippets for use in your own project.  Feel free to contact me or leave a comment if you have questions or feedback.


-Frog Out

Calling Azure AD Secured Azure Function Externally From JavaScript

My customer recently had a need to securely call an HTTP trigger on an Azure Function remotely from an arbitrary client web application.  In this scenario securely meant ensuring that the user has logged into Azure Active Directory (AAD), but any number of authentication providers could be used.  The SharePoint Patterns and Practices (PnP) team had posted a video (SharePoint PnP Webcast – Calling external APIs securely from SharePoint Framework) that used the SharePoint Framework but my team needed to do this from vanilla JavaScript.  Many thanks to the PnP team and my peer Srinivas Varukala for their inspiration and code samples.

Overview

The key components to this solution involve the following:

  • Azure AD app registration (used to enforce authentication on Azure Function)
  • Azure Function configured to enforce Azure AD authentication
  • Client web application with JavaScript code to call the Azure Function

Azure Function

In the Azure Portal create a new Azure Function.  Choose an HTTP Trigger and use the language of choice (I’m using C# script in this example).  The Azure Function will validate if a claims principal exists on the incoming request and then output to the logs the name of the user if authenticated.

<Update 2018-05-02>

Note: the Azure portal currently does not support the headers required for CORS (cross-origin resource sharing) requests that contain credentials.  Feedback (source) has been provided to the Azure App Service team to support this but was declined.  As such the manual processing of CORS  requests is not supported at this time.  You will need to determine if this workaround works for you or not.

</Update 2018-05-02>

<Update 2019-06-25>

Thanks to comment from Michael Armstrong who pointed out that CORS with credential headers is now supported in Azure App Service.  I have validated that this will work with the updated configuration detailed in the post now.

</Update 2019-06-25>

using System.Net;
using System.Security.Claims;
using System.Threading;
public static HttpResponseMessage Run(HttpRequestMessage req, TraceWriter log)
{
  log.Info("C# HTTP trigger function processed a request.");
// check for authenticated user on incoming request
  if (!ClaimsPrincipal.Current.Identity.IsAuthenticated)
  {
    log.Info("Claims: Not authenticated");
  }
  else
  {
    log.Info("Claims: Authenticated as " + ClaimsPrincipal.Current.Identity.Name);
  }

  var resp = req.CreateResponse(HttpStatusCode.OK, "Hello there " + ClaimsPrincipal.Current.Identity.Name);

  // manually process CORS request (no longer needed with 
  //if (req.Headers.Contains("Origin"))
  //{
  //  var origin = req.Headers.GetValues("origin").FirstOrDefault();
  //  resp.Headers.Add("Access-Control-Allow-Credentials", "true");
  //  resp.Headers.Add("Access-Control-Allow-Origin", origin);
  //  resp.Headers.Add("Access-Control-Allow-Methods", "GET, POST, OPTIONS");
  //  resp.Headers.Add("Access-Control-Allow-Headers", "Content-Type, Set-Cookie");
  //}
  return resp;
}

Azure AD App

In order to enforce Azure AD authentication on the Azure Function an Azure AD app registration needs to be created.  Log into the Azure AD admin portal.  Under Azure Active Directory –> App Registrations create a new app registration.

SecureCallAFFromJS1

Take note of the Application ID (also known as client ID) for the application created.  This will be used later in the Azure App Service authentication / authorization configuration.

SecureCallAFFromJS2

The default permissions for the Azure AD app registration (delegated: sign in and read user profile) will be sufficient.

SecureCallAFFromJS3

SecureCallAFFromJS4

Enforce authentication

Return to the Azure Function and navigate to the Platform features –> Authentication / Authorization screen.  Turn App Service Authentication to On, set “Action to take…” to “Log in with Azure Active Directory”, then click the Azure Active Directory authentication provider to configure it as follows.

SecureCallAFFromJS5

Fill in the Application ID / Client ID from the previously created Azure AD app registration.  Specify the IssuerUrl of the Azure AD domain (typically https://login.microsoftonline.com/TENANT_NAME_GOES_HERE.onmicrosoft.com).

SecureCallAFFromJS6

Remove CORS configuration

As noted previously, the Azure portal currently (as of writing May 1, 2018) does not support Azure App Service processing CORS requests that contain credentials.  As such removing all domains from the CORS configuration in Azure Portal is unsupported.  Please validate if this workaround works for you or not.

<Update 2019-06-25>

Update CORS configuration

Now that Azure App Service supports processing CORS requests that contain credentials, update the CORS settings with the allowed origins that will be calling into your App Service (Azure Function).

Note that the values in below screenshot are using values from running my sample app in debug mode.  You’ll want to use the published location for a production environment.

SecureCallAFFromJS16

</Update 2019-06-25>


Client code

In this example I started with a .Net Framework MVC project from Visual Studio 2017 v15.6.7 but the code could be hosted on any page with HTML, JavaScript, and a logged in user to Azure AD.  Note that the MVC project allows enforcing Azure AD authentication which is what I was most interested in.

SecureCallAFFromJS8

SecureCallAFFromJS9
HTML snippet to include inside of an IFRAME element with source pointing to root of Azure Function.

SecureCallAFFromJS13

<Update 2019-04-11> After the IFRAME has loaded and authenticated you should see a cookie tied to the domain hosting the Azure Function.  See following for successful setting of the auth cookie.

SecureCallAFFromJS15

If this cookie is not set (ex. cookie size is too large, request / response headers deny the cookie, cookies not allowed by policy, etc.) the outgoing AJAX request will not be able to satisfy the authentication requirement which will result in an error.  See following for sample issues that could be encountered when setting the auth cookie.

SecureCallAFFromJS14

</Update 2019-04-11>

JavaScript snippet to call HTTP trigger of Azure Function.

Note that in a production scenario you would want to ensure that the IFRAME has loaded fully (and thus authentication cookie set) prior to the Azure Function being called.

  $(document).ready(function () {
    $("#btnExternalCall").click(function (e) {

      var serviceURL = "https://NAME_OF_AZURE_FUNCTION_GOES_HERE.azurewebsites.net/api/HttpTriggerCSharp1";

      $.ajax({
        url: serviceURL,
        type: "GET",
        xhrFields: {
          withCredentials: true
        },
        crossDomain: true,
        success: function (data) {
          alert("Success: " + data);
        },
        error: function (ex) {
          alert("Failure getting user token");
      }
    });
  });
});

Testing

When all has been configured you can test scenario.  If you enter F12 developer tools from your browser of choice you should see the authentication cookie for both the client web application as well as the Azure Function domains.

SecureCallAFFromJS10

After issuing the call to the HTTP Trigger on the Azure Function you should see that the call was indeed authenticated and the ClaimsPrincipal is returned.

SecureCallAFFromJS11SecureCallAFFromJS12

Conclusion

This is a very powerful capability being able to ensure that an HTTP trigger on an Azure Function only allows authenticated users to call the endpoint.  Hopefully this post helps others who have a similar need.  Please leave and questions or feedback in the comments below.

-Frog Out